Managing Tasks for Event Planners
This article explains how event planners can use tasks (i.e., reminders or to-do items) in Mazévo to help them manage events and provide attentive customer service.
Overview
Tasks are reminders to perform an action like call the customer to get information, create a setup diagram for a booking, or double-check a catering order. Each task is tied to an event, booking, or organization, which gives the event planner context about what needs to be done.
When creating an event in Mazévo, the event planner can add a series of tasks that must be completed. If the system is configured to do so, it can automatically add tasks to new events and bookings when they're created based on a specified "trigger."
Mazévo has two main tools to aid event planners in monitoring and managing tasks:
- Manage tasks
- Event editor
Manage Tasks
Manage tasks is a tool that allows an event planner to view and edit any task in the system, not just tasks assigned to them. That said, typically event planners use the tool to review and update tasks that have been assigned to them. The manage tasks tool displays a list of tasks that match the filters entered by the user.
These filters are:
- State. The two states are open or completed.
- Due Date or Date Completed. If you are filtering for open tasks, you can also filter for a range of due dates. The system always displays overdue tasks as well. If you are filtering for completed tasks, you can specify a range for the completion date.
- Task Description. You can filter the list of tasks to a list of selected task descriptions.
- Attached To. You can filter by what the task is attached to. For example, you can have the system show you only tasks tied to events.
- User. You can filter by the user or users that are responsible for performing the task.

To view or edit tasks:
1. Set the filters as appropriate.
2. Click Search.
3. Review the list. As with all grids in Mazévo, column widths can be changed. Click a column heading to change the sort order. Group or export tasks by selecting a Group By or Export option at the top right side of the display. To edit a task, click the due date. You can also open the event that the task is associated with by clicking the event name. The event opens in a new browser tab.

To mark a task as completed:
1. Choose one or more tasks by checking the box in the left column.
2. Click Mark as Complete at the top of the grid.
The system records the date completed and the user that is completing the task in history.

3. You can also mark a task as completed by clicking the due date, changing the state to Complete, and clicking Save. In addition, you can change the due date of an open task and enter notes about it.

Tasks that the system creates automatically may not be assigned initially to a user who is responsible for completing them. The processes for assigning a user or changing the currently assigned user follow the same steps.
To assign or change the responsible user on a task:
1. Select one or more tasks by checking the box in the first column of the grid.
2. Click Responsible User on the menu at the top of the grid that is shown when one or more tasks are selected.
3. On the Responsible Users window, add or delete users as appropriate and click Save.

To add a task to an organization:
1. On the Task grid, click Add Task.
2. Provide all necessary information for the task, which can include:
- Task Description
- Due Date
- Organization
- Notes
- Responsible Users

Event Editor
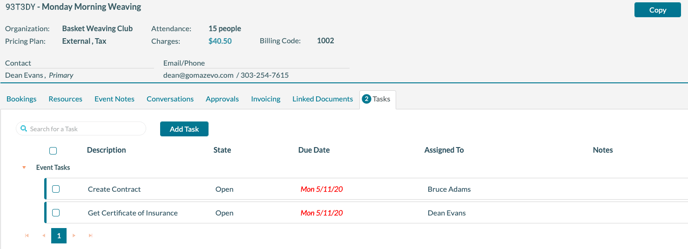
The event editor—the main tool for viewing and modifying event details—can also be used to manage the tasks associated with an event.
To view or add tasks from the event editor:
1. Open the event in the event editor.
2. Click the Tasks tab. From this tab, you can do the following:
- Change the state of a task
- Change the responsible user assigned to tasks
- Add a new task to the event

To mark a task as completed:
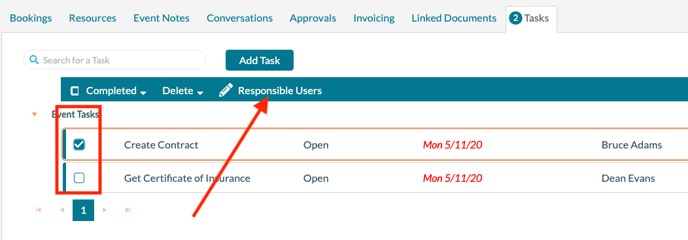
1. Select one or more tasks by checking the box in the left column.
2. Select Yes from the Completed menu at the top of the grid.
The system records the date completed and the user that is marking the task as completed in history for each of the tasks modified.
3. You can also mark a task as completed by clicking the due date, changing the state to Complete, and clicking Save. In addition, you can change the due date of the open task and enter notes about it.

Tasks that the system creates automatically may not be assigned initially to a user who is responsible for completing them. The processes for assigning a user or changing the currently assigned user follow the same steps.
To assign or change the responsible user on a task:
1. Select one or more tasks by checking the box in the first column of the grid.
2. Click Responsible User on the menu at the top of the grid that is shown when one or more tasks are selected.
3. On the Responsible Users window, add or delete users as appropriate and click Save.

To add a task to an event:
1. Click Add Task.
2. Provide the necessary information, which may include:
- Task Description
- Due Date
- Notes
- Responsible Users
To add a task to one or more bookings:
1. Click the Bookings tab.
2. Select bookings by checking the associated box in the left column.
3. Click Add Task and enter the necessary information, which may include:
- Task Description
- Due Date
- Notes
- Responsible Users

