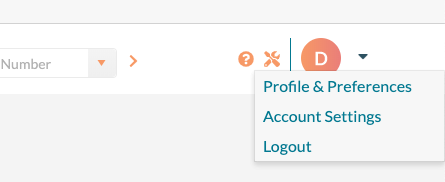
To access account settings:
1. Hover your cursor over the arrow beside your initial in the upper right corner of the window.
2. Select Account Settings.
The system then displays a window to review/modify the settings listed below.

Logo tab
You can upload a logo and set the primary color used on confirmations and invoices. The recommended size for the logo is 300 x 300.
If you purchased the branding option, you will have two additional logos/icons to upload. First, you can add a logo to use in the upper left corner of the application. This logo should be no more than 50 pixels tall. Upload a 32 x 32 icon to use when Mazevo runs on a phone.
Login tab
- Alert Message - The alert message is displayed for all users when they log into Mazévo. The message is displayed at the top of the screen and can be dismissed by pressing the 'x.'
- Requester Support Message - This message is displayed when a requester presses the 'Need Help?' link at the top of the screen. The purpose of the message is to direct your users to the proper support within your facility rather than having the requester contact Mazévo directly.
- Support Contact Name, Email, Phone, and Notes—Mazevo support can use this information to help users who contact us directly.
Vanity URL tab
- Request Account Notes Label - The description (label) for the request account page.
- Login Welcome Message - This message is displayed at the top of the vanity URL page.
Emails tab
- Reply Email for Account Maintenance - The Reply Email is used when Mazévo sends system emails to the user. If the user replies to the email, Mazevo will direct the email to this address. If the reply address is blank, the default reply address of 'Notifications@mymazevo.com' will be used.
There are five system-generated emails that you can customize to your organization's needs. The messages are:
- Change Email Address - Sent to users when they change their email address in Mazévo.
- Confirm Email - Sent to users to confirm their email address and set a new password.
- Email Address Changed - Sent to a user after successfully changing their email address.
- Forgot Password - Sent to a user when they press 'Forgot Password.'
- Request Summary - Sent to a requester after submitting a new request. This feature is turned on by Mazevo Support. If a red 'x' displayed next to Request Summary, the feature is off.
- Welcome New Requester - Sent to a new requester when the account is created. The welcome email will not be sent if the subject line is blank.
To edit one of the email messages, click on the email name. When the email is generated, special fields are substituted for each message. You can use these fields (first name, last name, old email, and new email) to personalize the message to the specific user.
All outbound email messages above will use a standard Mazévo logo by default. However, you can upload your organization's logo to replace the Mazévo logo. If you do not want to include the logo in the body of the email, check Hide Logo in Emails.
Calendar tab
- Public Calendar Link - This link can be copied and used on an external website to launch an interactive calendar of events with data from Mazévo. Note that if an event has been marked as "private," none of its bookings will be displayed on the public calendar.
Inquiries tab
- Use Inquiry Form - If you want to use the inquiry form, check this box. The following fields will be available.
- Inquiry Form Link - This link can be copied and used on an external website to launch the inquiry form.
- Inquiry Header Message - This message will be displayed at the top of the inquiry form.